Iterm2, oh-my-zsh 설치
iterm2?
터미널의 대체 CLI. 기본으로 제공하는 터미널보다 강력한 기능을 제공한다.
화면분할, 검색, 자동완성, 마우스 이동하지 않고 복사하기 등 여러가지 편의 기능을 제공한다.
oh-my-zsh?
zsh 를 사용하는 사용자에게 여러가지 편의 기능을 제공하며, 무엇보다 이쁘게 꾸밀 수 있게 도와준다.
zsh?
기본 쉘 bash 보다 강력한 기능을 제공한다. 아래의 포스트를 참고하자.
#1. iterm2 설치
Terminal 에 아래의 명령문을 실행시켜서 설치.
brew cask install iterm2
#2. oh-my-zsh 설치
Terminal 에 아래의 명령문을 실행시켜서 설치.
- curl 을 이용해서 설치
$ sh -c "$(wget https://raw.github.com/ohmyzsh/ohmyzsh/master/tools/install.sh -O -)"
- wget 을 이용해서 (Homebrew 로 wget 을 설치하였다면 아래의 명령문을 이용하자.
$ sh -c "$(curl -fsSL https://raw.github.com/ohmyzsh/ohmyzsh/master/tools/install.sh)"
#OSX 카탈리나 부터 zsh 가 기본적으로 제공된다고 한다.
혹시 없지 않을까 의심된다면 Terminal 에서 아래의 명령어 실행해보자.
which zsh
아무것도 나오지 않은다면 설치를 해야한다. brew search zsh 로 검색해서 설치를 해보자.
설치 방법은 앞의 포스트에서 적었듯 brew install zsh 가 되겠다.
#현재 자기가 사용하는 shell 을 보고 싶다면 echo $SHELL 이라고 입력하고 실행하면 알 수 있다.
사용하고자 하는 쉘을 바꾸고 싶다면
chsh -s /bin/bash → bash 로 바꾸기
chsh -s /bin/zsh → zsh 로 바꾸기
여기까지 하고 iterm2 를 실행시키면 아래와 같은 에러 메시지가 나타날 수 있다.

위에 권한 관련한 메시지는 무시하고, 마지막 3줄에 집중하자.
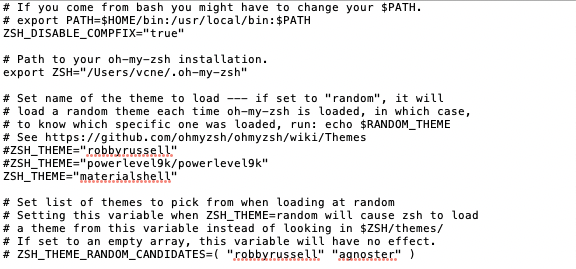
zsh_disable_compfix to "true" 를 넣어주라고 한다.
Terminal 에서 open ~/.zshrc 실행시켜서 zsh_disable_compfix="true" 를 넣어주자.
#아래 이미지의 3번째 줄 참조
저장하고 다시 iterm2 를 실행해보면 에러 없이 깔끔하게 열린다.
#3. 테마 설치
Iterm2를 열어서 아래의 명령문 실행
git clone https://github.com/bhilburn/powerlevel9k.git ~/.oh-my-zsh/custom/themes/powerlevel9k
깃헙에 있는 테마 파일이, 아래의 루트에 설치된다.
~/.oh-my-zsh/custom/themes/powerlevel9k
finder 에서 루트 디렉토리로 이동 후에 cmd + h 를 누르면 숨겨진 폴더인 .oh-my-zsh 디렉토리가 보이니, 설치된 위치를 확인할 수 있다.
.zshrc 파일에 Powerlevel9k를 테마로 지정하면 테마가 적용된다.
.zshrc 파일을 열고 ZSH_THEME이 적힌 줄을 찾아서 아래와 같이 바꿔주면 된다.
ZSH_THEME="powerlevel9k/powerlevel9k"
-code ~/.zshrc : vscode 의 편집기로 해당 파일을 열어서 편집 할 수 있다.
-open ~/.zshrc : 일반 텍스트 편집기로 열어서 편집할 수 있다.
#.zshrc 파일이 없을 경우도 있을 수 있는데, 이 때는 그냥 만들어주면 된다. (구글링)
테마를 적용하고 iterm2 를 종료시키고 다시 실행해보면 테마는 적용되어 있으나 폰트가 깨져있을 수도 있다.
폰트를 설치해준다.
brew tap caskroom/fonts && brew cask install font-source-code-pro
그 후에 iterm 환경 설정에서 Profile > Text > Font > 에서 방금 설치한 폰트를 설정해주면 된다.
아래의 화면은 구글링해서 material thema 의 oceanic 테마를 적용해서 배경색을 약간 바꾼 후의 모습이다.

#iterm2 유저의 이름이 나오지 않도록 하기
터미널 입력 할 때 username@username-MacBook-Pro 이런 식으로 길게 나오는데, 이걸 없에고 싶다면
. zshrc 파일의 가장 최하단에 아래의 코드를 삽입해주면 된다.
default_user=$user 혹은 prompt_context(){}
#Ref
https://iterm2.com/features.html
Features - iTerm2 - macOS Terminal Replacement
iTerm2 has a lot of features. Every conceivable desire a terminal user might have has been foreseen and solved. And these are just the main attractions! Split Panes Divide a tab up into multiple panes, each one showing a different session. You can slice ve
iterm2.com
Oh My Zsh - a delightful & open source framework for Zsh
Oh-My-Zsh is a delightful, open source, community-driven framework for managing your ZSH configuration. It comes bundled with several helpful functions, helpers, plugins, themes, and a few things that make you shout... OH MY ZSH!
ohmyz.sh
https://www.howtogeek.com/362409/what-is-zsh-and-why-should-you-use-it-instead-of-bash/
What is ZSH, and Why Should You Use It Instead of Bash?
ZSH, also called the Z shell, is an extended version of the Bourne Shell (sh), with plenty of new features, and support for plugins and themes. Since it’s based on the same shell as Bash, ZSH has many of the same features, and switching over is a breeze.
www.howtogeek.com
'MAC' 카테고리의 다른 글
| Mac 개발환경 설정3(Visual-Studio-Code) (0) | 2020.09.04 |
|---|---|
| Mac 개발환경 설정1(Homebrew) (0) | 2020.09.04 |
| Homebrew Package 설치 위치 알아내기 (0) | 2020.09.01 |
| MAC shortcut 정리 (0) | 2020.08.20 |


